Food Dehydrators - Do You Really Need One?
Best Food dehydrators certainly do have some pros and perks. But then, so do air and oven drying. Let's take a look at some of the pros and cons of dehydrators and other methods.
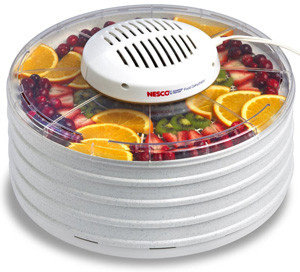
1. Dehydrators
These neat machines look a bit like air purifiers or humidifiers. They work by circulating hot, dry air around food at a temperature of about 150 degrees F.
Pros
* Speed - There's no doubt that dehydrators speed up the process of food drying, sometimes significantly. Fast drying means bacteria have less time to grow, and it also means that foods tend to retain their color better.
* Space - A dehydrator takes up a lot less space than spreading foods all over screens or stringing them on thread and hanging them in garlands.
* Convenience - When you dry food in a dehydrator, you don't have to carry your food indoors at night and put it back out in the morning. You also don't have to worry about leaving an oven on all day if you have to step out.
Cons
* Expense - Dehydrators can be expensive. Expect to pay anywhere from $40 to $250 for various models. But have a lot of food dehydrator under $100 in here, You can referrer
* Energy use - Dehydrators don't necessarily use a lot of energy, but they certainly do use more household electricity than air and sun drying.
* Storage - You won't be using your dehydrator every day, so storing it when you're not using it (which is most of the time) can be a problem.
2. Oven Drying
Pros
* Saves space - Since you already have an oven in your kitchen, you don't have to make space for another appliance, or for homemade drying racks.
* Relatively fast - Oven drying is not as fast as a dehydrator due to the lack of circulating air; but it's generally faster than air drying.
Cons
* Energy use - Oven drying is probably the most energy-consumptive method. Even on a low temperature, it takes a decent amount of electricity to keep an oven warm constantly.
* Inconvenience - You can't cook or bake anything else in the oven until the food is dry.
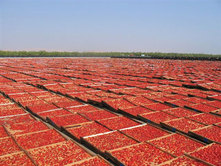
3. Air and Sun Drying
Pros
* Free energy - You don't have to concern yourself with using electricity - sun and air are free!
* Flavor - Some claim that air and sun drying produces the best flavor in produce, and infuses it with "natural energy" instead of electrical energy.
Cons
* Pests - Bugs, rodents, and pets can spoil your efforts.
* Weather - If the weather turns wet and you can't get your food inside on time, your whole venture may be ruined.
As you look at this list, it seems like dehydrators do stand out as the most effective means of drying food. But if you can't afford one or if you don't have a place to store one, or if you are just working with a small amount of food to dry, the oven and the air and sun can still work. You can also check at yard sales this summer and see if anyone is selling a used dehydrator for cheap.
1. Dehydrators
These neat machines look a bit like air purifiers or humidifiers. They work by circulating hot, dry air around food at a temperature of about 150 degrees F.
Pros
* Speed - There's no doubt that dehydrators speed up the process of food drying, sometimes significantly. Fast drying means bacteria have less time to grow, and it also means that foods tend to retain their color better.
* Space - A dehydrator takes up a lot less space than spreading foods all over screens or stringing them on thread and hanging them in garlands.
* Convenience - When you dry food in a dehydrator, you don't have to carry your food indoors at night and put it back out in the morning. You also don't have to worry about leaving an oven on all day if you have to step out.
Cons
* Expense - Dehydrators can be expensive. Expect to pay anywhere from $40 to $250 for various models. But have a lot of food dehydrator under $100 in here, You can referrer
* Energy use - Dehydrators don't necessarily use a lot of energy, but they certainly do use more household electricity than air and sun drying.
* Storage - You won't be using your dehydrator every day, so storing it when you're not using it (which is most of the time) can be a problem.
2. Oven Drying
Pros
* Saves space - Since you already have an oven in your kitchen, you don't have to make space for another appliance, or for homemade drying racks.
* Relatively fast - Oven drying is not as fast as a dehydrator due to the lack of circulating air; but it's generally faster than air drying.
Cons
* Energy use - Oven drying is probably the most energy-consumptive method. Even on a low temperature, it takes a decent amount of electricity to keep an oven warm constantly.
* Inconvenience - You can't cook or bake anything else in the oven until the food is dry.
3. Air and Sun Drying
Pros
* Free energy - You don't have to concern yourself with using electricity - sun and air are free!
* Flavor - Some claim that air and sun drying produces the best flavor in produce, and infuses it with "natural energy" instead of electrical energy.
Cons
* Pests - Bugs, rodents, and pets can spoil your efforts.
* Weather - If the weather turns wet and you can't get your food inside on time, your whole venture may be ruined.
As you look at this list, it seems like dehydrators do stand out as the most effective means of drying food. But if you can't afford one or if you don't have a place to store one, or if you are just working with a small amount of food to dry, the oven and the air and sun can still work. You can also check at yard sales this summer and see if anyone is selling a used dehydrator for cheap.
How to Make Jerky With and Without a Dehydrator
If you've checked the price of jerky in the store - especially organic or nitrite/nitrate-free jerky - then you know how expensive it can be. But you can still enjoy healthful jerky by making your own. What a great way to take advantage of a meat sale at your local store, or preserve the bounty from a hunter in your family. Even if you don't have a dehydrator, you can make jerky at home. Some techniques are the same, and some differ. Here's how to make jerky with and without a dehydrator.
Using a Dehydrator
When using a dehydrator, sources recommend drying about 3 pounds at a time. If you are using beef, the best cuts for jerky are pieces like London broil, flank steak, brisket, or skirt steak. The leaner the better.
First, marinating the beef is important. It provides flavor and tenderizes the meat. You can use any marinade you like, but a general one that helps produce that jerky flavor is this recipe:
Ingredients:
* 3/4 cup soy sauce
* 3/4 cup Worcestershire sauce
* 1/4 cup lemon juice
* 1 1/2 teaspoons sugar
* 1 teaspoon salt
* 4 cloves minced garlic or 2 teaspoons garlic powder
Mix these ingredients together and slice the beef. Slice it as thinly as possible, removing any fat you find as you go. The strips of beef should be cut across the grain and should be 6 to 8 inches long.
Then mix the marinade and beef slices in a zip top plastic bag. Knead the bag to make sure the beef is all coated with marinade. Refrigerate overnight, turning the bag occasionally (if you get up for a midnight snack, for instance!). In the morning, remove the beef from the marinade, and prepare your dehydrator by oiling the racks lightly.
When placing the beef strips on the racks, make sure they don't overlap. Leave a bit of space between the slices, too. Sources recommend turning the dehydrator to about 150 degrees, but if your dehydrator comes with instructions, follow those.
Once the jerky is dry and cool, store it in airtight containers. You can freeze it or store it in the refrigerator.
Without a Dehydrator
You can still dry meat without a dehydrator. The process is the same for slicing, marinating, and storing. But instead of putting the meat in a dehydrator, you can use your oven. A broiler pan is ideal, as the meat will need to be on a rack. You can just put the strips directly on the oven rack, but put a cookie sheet on the rack underneath in case the shrinking meat falls through.
Set your oven to 200 degrees F and bake the meat for about an hour. It may take up to 90 minutes to get the texture you want.
